博文
PostgreSQL9.1 Hot-Standby ---之基于流复制的方法
|||
本教程是PostgreSQL Cluster系列教程的一部分,该系列包括:
PostgreSQL9.1 PITR示例 (该教程主要阐述DBA如何基于WAL日志做备份恢复)
PostgreSQL9.1 Warm-Standby ---之基于拷贝WAL文件的方法 (file-based log shipping)
PostgreSQL9.1 Warm-Standby ---之基于流复制的方法 (streaming replication)
PostgreSQL9.1 Warm-Standby ---之基于同步复制的方法 (Synchronous Replication)
PG9.1+pgpool-II3.1--之Load Balancing (when meeting large amounts of requests)
PG9.1+pgpool-II3.1--之Parallel Query (when meeting large amounts of data)
PostgreSQL9.1 HA --- 之Slony
好了,有了第三个PostgreSQL9.1 Warm-Standby ---之基于流复制的方法 (streaming replication)教程,我们配置Hot-standby的就不难了。先上两张图,以说明流复制的含义,根据Replication in PostgreSQL (II) – Hot Standby/Streaming Replication: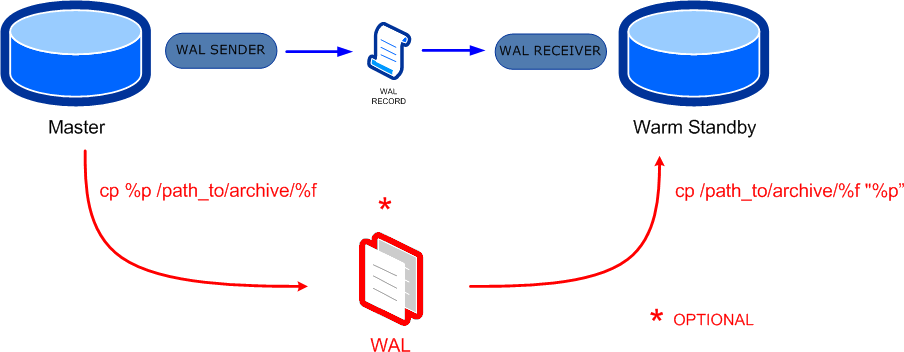
以及根据Getting ready for PostgreSQL 9.1,第32页: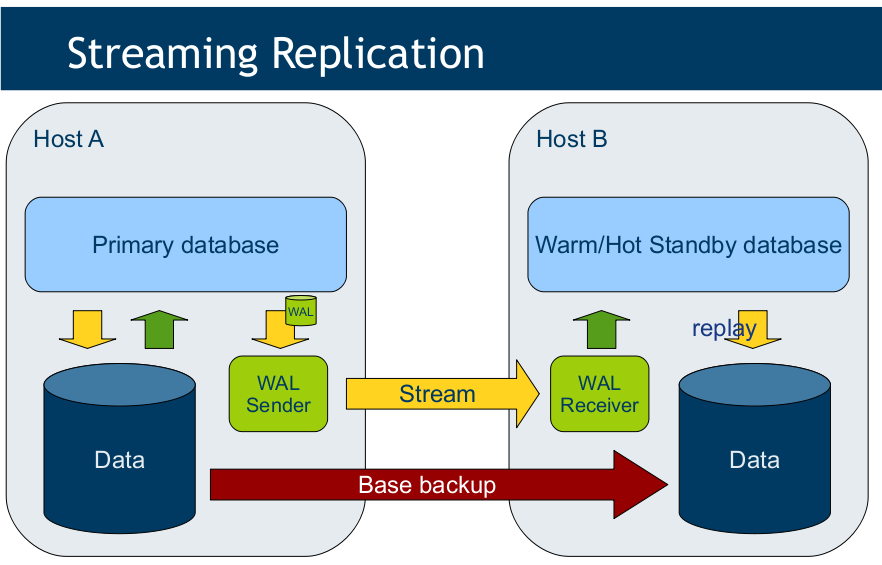
从而我们知道,流复制中的“流”是指WAL每个record,关于record是什么,有兴趣的朋友可以继续研究,此处不再讨论。为保持本文对初学者的可操作性,还是从安装开始。
先说机器配置,建议你都先创建好:
/home/postgres/db/master/pgsql 目录是master数据库的目录,端口为5432
/home/postgres/db/standby/pgsql 目录是一台standy数据库的目录,端口为6432
/home/postgres/archive 是master->standby的WAL日志中转地点
/home/postgres/base 是master->standby的基础备份库的目录
我们说说怎么配置:
1. Master和Hot-standby数据库服务器的安装:
master安装并插入100万条数据(本文不用ssl,故在configure时不用--with-openssl,本文不再使用pg_standby扩展,也不许要make world):
cd /home/postgres/develop/
rm -fr postgresql-9.1.2
tar zxf postgresql-9.1.2.tar.gz
cd postgresql-9.1.2
./configure --prefix=/home/postgres/db/master/pgsql --with-includes=/usr/local/readline/include --with-libraries=/usr/local/readline/lib
make
make install
/home/postgres/db/master/pgsql/bin/initdb -D /home/postgres/db/master/pgsql/data
/home/postgres/db/master/pgsql/bin/postmaster -D /home/postgres/db/master/pgsql/data
/home/postgres/db/master/pgsql/bin/createdb mydb
/home/postgres/db/master/pgsql/bin/psql mydb
mydb=# create table foo(id bigint);
mydb=# insert into foo select * from generate_series(1,1000000);
Hot-standby:
cd /home/postgres/develop/
rm -fr postgresql-9.1.2
tar zxf postgresql-9.1.2.tar.gz
cd postgresql-9.1.2
./configure --prefix=/home/postgres/db/standby/pgsql --with-includes=/usr/local/readline/include --with-libraries=/usr/local/readline/lib --with-pgport=6432
make
make install
/home/postgres/db/standby/pgsql/bin/initdb -D /home/postgres/db/standby/pgsql/data
然后修改postgresql.conf:port = 6432,保存。
/home/postgres/db/standby/pgsql/bin/postmaster -D /home/postgres/db/standby/pgsql/data
/home/postgres/db/standby/pgsql/bin/createdb mydb --port=6432
好,最后查看一下是否安装成功:
/home/postgres/db/standby/pgsql/bin/psql mydb --port=6432
2. 配置Master,并做一次base backup
编辑 postgresql.conf 以支持 WAL archiving:
wal_level = hot_standby
archive_mode = on
archive_command = 'cp %p /home/postgres/archive/%f'
max_wal_senders = 1
创建Hot-standby能访问Master的用户replication_role:
修改 pg_hba.conf 以允许repluser访问,此处简单使用password方法,而没用md5:
host replication repluser 127.0.0.1/32 password
然后做一次基础备份(后面的warm-standby主要使用data目录下文件):
mydb=# SELECT pg_start_backup('bak20120228');
[postgres@localhost pgsql]$ cd /home/postgres/db/master/pgsql/
[postgres@localhost pgsql]$ tar czvf /home/postgres/base/base_data.tar.gz data/
mydb=# SELECT pg_stop_backup();
3.Hot-standby,并启动
把上面基础备份的打包文件覆盖standby的data目录:
cd /home/postgres/db/standby/pgsql/
mv data data_bk
tar -xzvf /home/postgres/base/base_data.tar.gz
rm -r data/pg_xlog/
mkdir -p data/pg_xlog/archive_status
rm data/postmaster.pid
cp /home/postgres/db/standby/pgsql/share/recovery.conf.sample /home/postgres/db/standby/pgsql/data/recovery.conf
cp /home/postgres/db/standby/pgsql/data_bk/postgresql.conf /home/postgres/db/standby/pgsql/data/postgresql.conf
cp /home/postgres/db/standby/pgsql/data_bk/pg_hba.conf /home/postgres/db/standby/pgsql/data/pg_hba.conf
然后编辑recovery.conf:
standby_mode = on
restore_command = 'cp /home/postgres/archive/%f %p'
primary_conninfo = 'host=127.0.0.1 port=5432 user=repluser password=pwd_repluser'
然后编辑pstgresql.conf:
hot_standby = on
好,启动Hot-Standby:
/home/postgres/db/standby/pgsql/bin/postmaster -D /home/postgres/db/standby/pgsql/data --port=6432
4. 冒烟测试(Smoke test,即配置好了系统首次进行测试):
在Master里插入一些新数据,看看是不是在standby里在进行恢复:
mydb=# insert into foo select * from generate_series(1,1000000);
然后启动一个standby的客户端psql,查看是不是新数据过来了:
mydb=# select count(*) from foo;
再看一下是不是过来了?是不是要比拷贝文件的方式快?
有朋友说,我原先没有把master的 postgresql.conf 配置成:wal_level = hot_standby,即以前很可能没配置,就是默认的minimal了,那么以前的WAL日志会不会有影响了,回答是当然有影响了,所以你需要重新对master做一次基础备份,然后用这个基础备份来配置hot-standby就可以了。
至此结束。
加我私人微信,交流技术。

https://blog.sciencenet.cn/blog-419883-541531.html
上一篇:PostgreSQL9.1 Hot-Standby ---之基于拷贝WAL文件的方法
下一篇:PostgreSQL9.1 Hot-Standby ---之基于同步复制的方法