博文
[转载]Basics of toy glider physics
||
Basics of toy glider physics
Throwing the problem
Forces and torques
Stability
Dampering the oscillation
Weight
Aerodynamic yield of the wing
Stability 2
Angle of attack
Cambered airfoils
Thick airfoils
Airfoil Algebra
Acknowledgments
The aim of this text is to provide some understanding in the physics of an airplane, to help in the design and tuning of little paper or balsa gliders.
The drawings do not always match real-world proportions, angles or air streams. Their purpose is to make you understand the principles.
Throwing the problem
The purpose of an airplane is to transport something through the air, be it some cargo, people, or just itself. The aircraft uses the air to fly, somehow like a boat uses water to float upon.
Let's start by focusing on the load that the aircraft transports; just the mass of it. Let's imagine a little ball of lead; a mass almost concentrated in a dot. Or say a coin...

We can throw it some distance away, like if it was a cannonball.
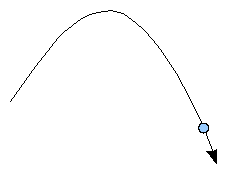
But that's not what we want. We want to build something around the coin that will allow it to hang in the air on a slow and straight path.

The most important part of an airplane are the wings. Some aircraft are just one big wing with nothing else... So lets take a postcard (or a rectangular sheet of balsa wood) and latch the coin in the middle of it.

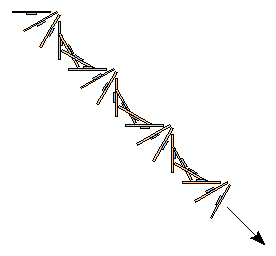
Then we gently throw this assembly like we would do with a toy glider and... the result is quite awful. One probable outcome is that the rectangle rotates at a fast rate around its longest axis and "flies" towards the ground with a straight angle. (Note that it didn't fall vertically towards the ground... we had a sideways displacement... this is encouraging!)
You may have the intuition that a solution could be to hang the coin below the sheet of balsa, like a pilot hangs below a delta glider. Maybe try this out using a rod of wood or ropes. Yet you won't get the desired result. The thing will probably fall to the ground making random movements. At best it will fall gently like a parachute. No flight...

You may have yet another intuition: that you should add a tail. A little rod that extends rearwards from the wing, with little surfaces at the end, like the tail of an arrow. You try to launch this like a toy glider... and still it's a catastrophe.
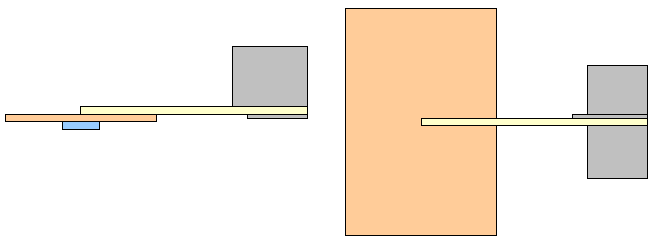
Placing the coin lower than the wing is good. Using a tail is good. But you didn't have the physics of flight in mind...
Forces and torques
When you hold a sheet of cardboard or balsa wood in your hand, with your arm extended, and you shear it through the air like a wing (with a slight upward tilt of the leading edge), it is pushed upwards by an aerodynamic lift force. The wing wings...

The air shearing along the wing, exerts relative pressure and suction forces all around the surfaces of the wing... Every single little portion of surface, experiences a tiny aerodynamic force. The force is different everywhere, and, what's even worse, it constantly changes... It's like if little bees were pushing and pulling everywhere on the wing. You easily can get the impression that no clear understanding can be build out of this mess...
Yet scientists have ways to extract key information out of such mess. The whole "mesh of bees", pushing and pulling all around the wing, can be summarized (averaged) to two things: one aerodynamic force and one aerodynamic torque. The force is what tends to push the wing upwards. The torque is what tends to make it turn around its main axis. (Remember that experiment above, when the wing fell sideways to the ground while turning at a fast rate around its main axis. The torque is responsible for the rotation.) When you hold a piece of cardboard in your hand and shear it through the air around you, you will easily feel the lift force but not the rotation torque, because that torque is quite weak. Anyway it is key for us.
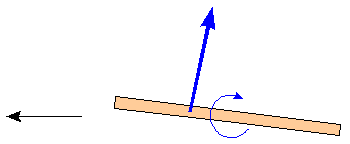
The aerodynamic force "seemingly grasps" the wing at about 1/3 from the leading edge. So, our first reaction would be to put the coin at 1/3 from the leading edge, expecting that now the force caused by the weight of the coin will be aligned with the aerodynamic force:
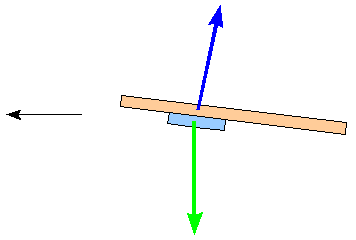
Nice try. But there are two bold errors. The first one is that you forgot to take into account the mass of the wing. The wing and the coin are a whole. If you want the center of mass of that whole to be 1/3 from the leading edge, you have to place the coin further away than 1/3 length.
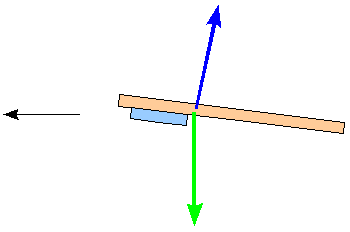
The other bold error is that the two forces (lift and weight) are not aligned. So they cannot compensate each other exactly. The force caused by the weight will always be directed vertically towards the ground. We can only change the aerodynamic force, by rotating the whole system counterclockwise. Now the wing flies slightly towards the ground. That's what happens in the real world: in still air, gliders slowly fly towards the ground.
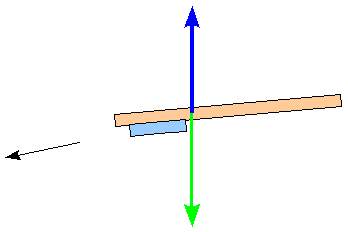
Nice work. But the postcard and the coin still won't fly correctly. That's because we forgot the aerodynamic torque. It's still there and it tends to make the thing flip upwards.
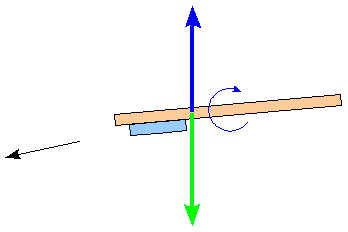
What can we do to counteract that torque? The most obvious proposal would be to add a tail to the postcard. It would be a little horizontal wing yet slightly turned so that it creates and aerodynamic force towards the sky, that counterbalances the torque from the main wing.
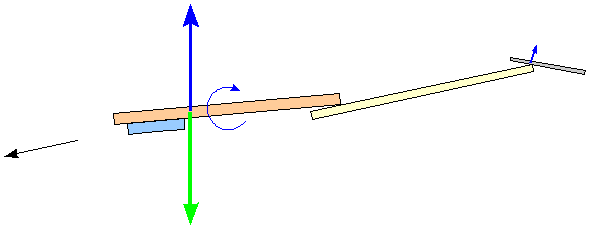
You indeed can compensate the torque that way... But if you try this out, by gluing a toothpick behind the postcard and a little square of paper at the end of the toothpick, you will never get a proper flight. Sure you did counterbalance the torque... but you created a highly unstable system. In other words: that thing can fly if you add a computer to it, with captors and actuators, and the computer constantly adapts the angle of the tail in order to keep flying straight. It's like the broom you hold vertically on your finger. You can hold it vertically quite a long time... with great efforts. (The Wright Brother's Flyer from 1903 was unstable too and the pilot constantly had to correct it's attitude. That's why flying a replica of the Flyer requires autorisations and a special training.)
We need another way to compensate the aerodynamic torque... The way that's used in almost every airplane is to place the center of mass of the system further ahead. The coin is placed even more forward. That way a torque appears, because the force of the weight is not aligned with the aerodynamic force.
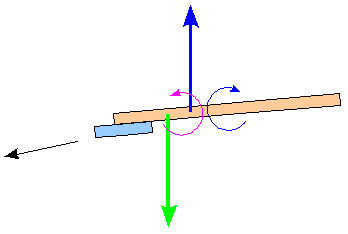
You have to place the coin so that the center of mass of the whole is 1/4 from the leading edge. Now you have a real chance to get the thing to fly correctly. Just a postcard with a coin you taped underneath... if you made sure that the center of mass of the whole is 1/4 from the leading edge:
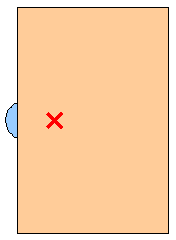
Remember that 1/4th chord forever. Since I use it, I never more had to tune the center of mass of a little glider. I always get a good flight from the first throw on, provided the center of mass is at 1/4 chord.
Possibly use a toothpick to place the weight further frontwards, ahead of the leading edge, in order to get the center of mass at 1/4th chord. But, keep in mind that the shape of the weight may cause an aerodynamic instability.
There are several ways to throw such a postcard glider:
Hold it loosely by the trailing edge and let it hang towards the ground, like a pendulum. Just open your fingers. The glider should accelerate while falling then bend its trajectory towards a stable flight.
Hold it by the nose but with your wrist turned towards you. Your fingers point towards your face while gently pinching the nose of the glider. Your eyes see the trailing edge. Make a forward movement with your arm while releasing the glider. Try to make sure that your fingers release the glider in its stable flight attitude and at the correct flight speed.
Glue a tiny vertical piece of balsa wood on the belly of the postcard, so you can hold it like you would a conventional balsa glider.
Don't be confused if you never manage to get a flight, even an awful and oscillating one. I don't always make successful flying postcards either. Just try to make another one with a different shape, possibly after reading the next chapter.
Stability
Throwing that coined postcard may still not yield a flight... because, though we have an equilibrium of the forces and torques, that equilibrium can be a tiny little bit unstable. No fuss... the trick to make it stable is very simple. Just make sure that the trailing edge is a tad upward. If you are using a postcard, bend it very slightly (hardly visible). If you are using a sheet of balsa wood, taper the underside of the trailing edge, using some sandpaper. That way you make what is called a "flying wing airfoil profile" (guess why...)
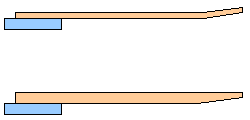
You should get a straight flight.
You may have to correct a tendency to turn, by slightly warping the rear ends of the wings, like you would do with a toy balsa or paper glider... Or cut out ailerons and bend them. Bend them only upwards, in order to keep a globally upwards trailing edge.
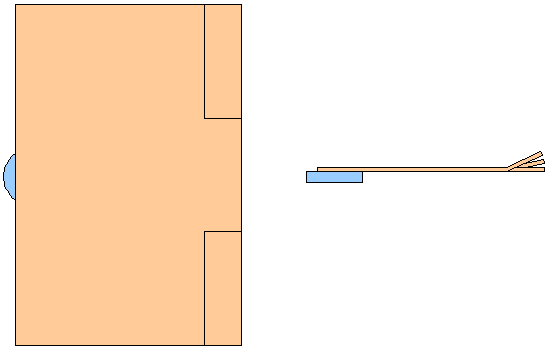
It is very important to insist on the fact that the equilibrium of this whole system is "stable". That's why you get a stable flight path, on a straight line, with the system not accelerating nor decelerating. The concept is called "self-regulation". Actually, the glider is constantly slightly changing speed, course and attitude. But, the mechanisms of the stability will bring the system back towards the position of equilibrium. For example, if the speed of the glider increases, the torque that tends to lift the nose upwards will gain slightly and the glider will both lift more and drag more... which makes the speed decrease. In shorter words: an increase of speed ultimately leads to a decrease in speed. Conversely, a decrease of speed ultimately leads to an increase of speed. That's how you get stability in an otherwise quite random system.
If you built such an elementary cardboard glider and it flies more or less correctly, you will probably notice that while flying it oscillates constantly around its main axis. The nose slightly pitches up and down constantly. It oscillates... This does not hamper flight, though it is not desirable because it makes the glider loose energy (drag more). The oscillation is part of the equilibrium but we will try to damper it down.
Yet another problem you will encounter with such simplified airplanes is that they can fly correctly on some distance (if you threw them well) then suddenly they go berserk and fall to the ground. They went out of stability... Their flight equilibrium is fragile! In the real world, when engineers build a new airplane, they have to prove that it will never go out of stability. More precisely, they have to prove that, if the airplane comes to get in any possible position and speed that disallows proper flight and stability, the aircraft will anyway always tend to get back towards proper flight and stability. The requirements are different for each kind of aircraft. Unpiloted model airplanes need to be firmly stable, in order to go on flying properly whatever the gusts of wind. Airplanes with pilots will rather tend to have a "neutral" equilibrium. This means that if you put them in a given position, they will tend to stay in that position. Military airplanes like fighter airplanes, can be slightly unstable because this increases their reactivity. Military pilots are trusted to be constantly focused on the attitude of the airplane and they are trained to cope instantly with all kinds of instabilities. (Modern fighter planes can be very easy to pilot, because they have onboard computers hat control everything...)
You may get yet another chance at getting the postcard to fly by slightly bending the outer triangles. Try to bend the two trailing triangles upwards... Try to bend the two leading ones downwards or maybe upwards... Try different triangle sizes and shapes...
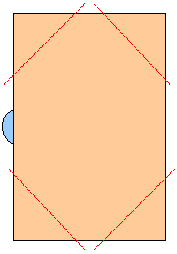
While you can make a proper glider using almost no maths, if you want to master all the problems of stability you will need high levels of Physics and Mathematics. After the Wright's Flyer in 1903, it took about 40 years before airplanes could be build that were perfectly stable and reliable in all circumstances. This problem of stability is key to almost every technological endeavor, be it a chemical plant, an artificial forest, a windmill, a rocket or a political or economic system. Many industrial accidents occur in developing countries, because to build a machine is easy, yet to build a stable one requires extended knowledge in several branches of Mathematics. Complex yet stable systems have been developed using few or no maths, like the boomerang, but this often required centuries of experimenting and many casualties...
Now back to our glider. It flies... It's a minimalistic shape to get flight... But it has many problems. It does not fly very far... It oscillates while flying...
Dampering the oscillation
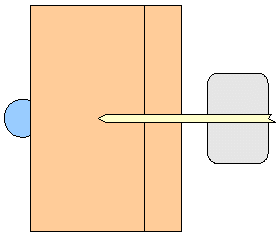
Let's first try to cope with the oscillation. Many solutions exist... It's much fun for model airplane builders, to conceive flying wings that do not oscillate, thanks to minute details in the shape of the wings. But the common solution will do: let's use a tail. Glue a thin rod of wood to the postcard and at the end of it glue a horizontal little surface of paper. (The mass of this tail forces you to put the coin even further ahead, in order to keep the center of mass of the whole at 1/4th chord of the wing.)
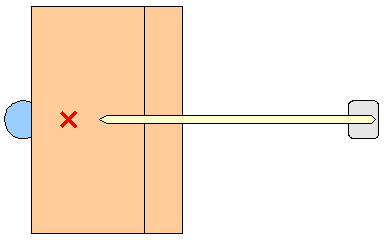
That little surface at the tail has only one purpose: to damper down the natural oscillation of the system. (You will see such little surfaces used in old clockworks, inside churches or museums.) Its purpose is by no way to act like the tail of an arrow. It absolutely not has the purpose to impose the angle at which the wing travels through the air. If it would impose that angle, superseding the self-regulation mechanism discussed above, there would be no more stable equilibrium, hence no flight! That's why the surface of that tail has to be very little, just enough to damper the oscillation.
Conversely, the angle at which the wooden rod emerges from the postcard, and the angle of the little surface in the flow or air, have almost no importance. Amongst toy glider builders, it is often tensely discussed what angle the tail should have, compared to the wings. A friend of mine makes much fun of this, as no angle at all perfectly does the job. I suppose that the optimal layout is to have the wings have some angle compared to the rod, but I never checked this out...

A quite natural rule is that if you put the horizontal tail closer to the wing, you have to increase its surface. This is up to you. A big horizontal tail surface, close to the wing, will be heavier, will create more drag and will aerodynamically interfere with the wing. On the other extreme, a very long tail with an infinitesimal surface at its end, will be fragile or will cause a problem with the center or mass... The compromise is in-between. Building an airplane is the art of computing out compromises...
Weight
Many beginners are puzzled by the weight that their glider should have. Actually, this is maybe the least important parameter of the system. Most gliders will fly correctly if they are made two, three, sometimes even ten times heavier. As long as the center of mass keeps being at 1/4th chord, you do what you want... Remember this system is self-regulating. If you increase the weight, the glider will simply fly faster, in order to generate enough lift to keep that weight in the air. If you decrease the weight, the glider will fly slower.
Of course there are practical limits. If the weight is so heavy that the wings bend away under the aerodynamic forces, you won't get a proper flight... A glider may be able to fly correctly but the high speed makes it won't survive many landings... On the opposite, a glider can also be too lightweight. At very low speed, the air will simply no more follow the wing profile correctly. Hence you have no more aerodynamic lift... (This depends on the chord of the wing. The longer the chord, the more you are allowed to decrease the speed. Conversely, if you want to make a glider that flies really slow, use wings with a strong chord.)
Even if the wings don't bend and the wing chord is not too short for the flight speed, you still may experience very different behaviors with different weights. I'd say that this is because your glider is "borderline". It is stable by chance, on a narrow margin of flight speeds. There is nothing wrong with this. I often build balsa gliders that behave that way. Just, there is no chance that the glider would be certified for manned flights...
Aerodynamic yield of the wing
This postcard glider is kind of a hybrid between a glider and a parachute... It does fly but with a steep angle towards the ground.
Let's talk a little bit about air pressure and depressure. Imagine a loose and heavy piston in the middle of a closed cylinder that contains air. If you place the cylinder vertically, the weight of the piston will make it descend slightly towards the ground. The air below the cylinder will be slightly compressed and the air above the cylinder is slightly depressed. That keeps the piston aloft, like hovering.
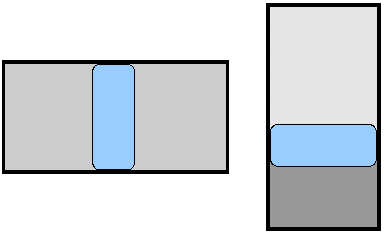
If there is air leaking along the piston, the piston will slowly fall to the bottom of the cylinder.
The postcard glider can be viewed in much the same way. Throw the postcard, yet between two vertical walls, in such a way that the walls close the port and starboard sides of the postcard. This is hardly doable but let's suppose that, like the piston in the cylinder, the sides of the postcard are airtight closed by the walls and this causes no friction.
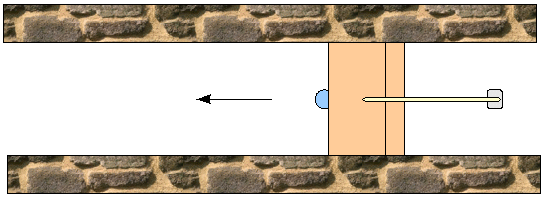
The air that shears above the postcard creates a depressure and the air that shears under the postcard creates a pressure. That's what keeps the postcard in the air, just like the piston stayed hovering inside the cylinder.

But here we have something very different from the piston, namely the fact that the leading edge and the trailing edge of the postcard are open. Hence you may fear that the pressure below leaks towards the depressure above... This does not happen, because the postcard is moving through the air and this dynamic system sustains the difference of pressure despite the open leading and trailing edges. If it wasn't for the frictions and turbulences (some of which are necessary to get lift and flight...), the postcard can stay flying at a constant altitude between the walls, just like the piston does inside the cylinder.
But what if we remove the walls? Then, the air will massively leak between the upper and down side of the postcard, along the port and starboard edges of the postcard. The pressurized air from underneath constantly filling the depression above the wing.
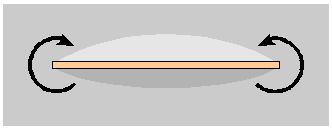
One first thought may be that this is not so bad. There is a loss of lift force... well let's compensate for this, by using a huger postcard... Actually, the problem is that the exchange of air makes the air turn in a massive whirl (two whirls, one on each side of the wing) and the rotation energy that those whirls contain... is drawn from the postcard. The whirls "suck" the postcard backwards and this makes that it quite quickly falls to the ground. Poor flight... The potential energy the postcard had, due to its height above the ground, is quickly transformed into whirl energy (which ultimately becomes simply heat).
You got it: we need to prevent that sideways leak of pressure. To the least we must decrease it. Yet we cannot have airplanes and gliders fly only between walls... Your first thought could be to have the postcard carry its own "walls". You would glue two other postcards aside of it, vertically, acting as embedded walls. The problems is that this creates a massive drag on itself... It's not a good solution.
A far better solution is to use a wide postcard. You still get those massive bleeds of air between the upside and the downside, but, as the length of the sides decreased compared to the width of the wing, the loss is proportionally less severe. Closer to the center of the wing, things will be like if flying between walls.
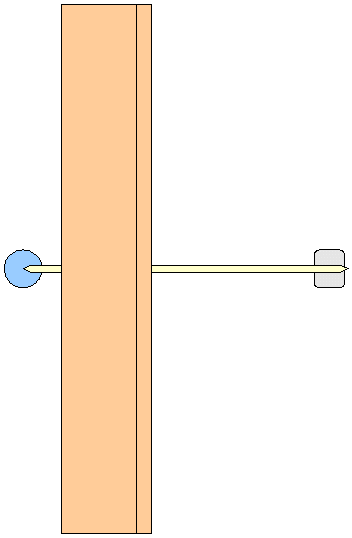

That's one reason why modern gliders have very wide wings, with a very narrow chord especially at the tips. But do not forget that toy gliders fly slowly, hence they need chord. I once was very puzzled by this. I build a very neat little balsa glider with extremely narrow and wide wings, nearly like a modern sport glider. I expected it to have a very good yield... but it almost parachuted to the ground.
To further regulate and decrease the whirls, you can cut rounded wing tips at the ends of the wings. The decrease of the turbulences and vibrations can even be felt in your fingers if you shear such a wing through the air.
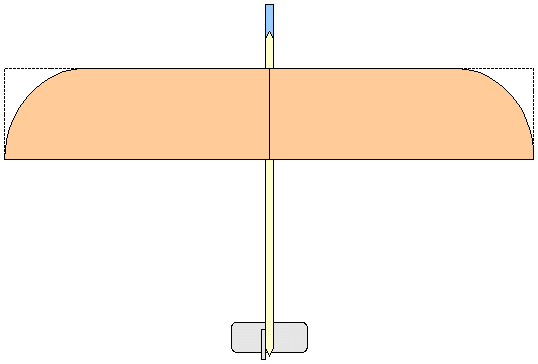
Such a wide wing with tapered wing tips would be what sea birds have (but the overall shape of their wings is ways more sophisticated than what I drew above).
The other simple way to cope with the turbulences would be the trapezoidal wings. With the delta wing being an extreme. Birds that live in cities and forest, making short and agile flights, tend to use the delta shape (include the tail and rotate 180°).
The trapezoidal wing can be felt as ideal. It is widely used and proven, it is close to optimal for the mechanical constraints, but it is not as perfect as you may expect. At every zone of say the downside of the wing, the air will slightly move towards the zone aside of it that's closer to the wing tips. Because, that zone creates less overall pressure because it has less surface. On the whole length of the downside, there is constant movement of the air towards the wing tips. While reciprocally, on the upside, there is a constant movement of air away from the wing tips. Those opposite movements meet behind the wings and create whirls that ultimately unite in two huge whirls similar to those spoken above for a rectangular wing.

Trapezoidal wings have some disadvantages, like the fact that their stalls are deadlier, because the stall tends to occur on the whole surface of the wing at once. On rectangular wings, the strong vortexes at the wing tips, ensure a correct air flow there, even when the center part of the wing is in a severe stall. And... remember the chord: if the ends of a trapezoidal wing have a too narrow chord for the flight speed of the glider...
Maybe try a trapezoidal wing with rounded wing tips...
Yet another optimal shape would be an almost rectangular wing with "winglets". To see beautiful such wings look at photographs of flying eagles. For example by using this image search page: http://www.google.be/images?q=eagle&biw=1272&bih=625 . How do winglets work? I can propose an explanation. Look at the 4:1 aspect ratio wing below. Let's arbitrarily decide that the outermost squares cause the worst turbulence and braking. Let's color them in red. They make half of the wing surface, so for sure this is not an optimal wing.

A wing with a sixth of the chord, with both end squares considered red zones, has proportionally much more efficient surface. It's a "high aspect ratio wing".

Now, we can create the same wing shape as the awful rectangle above but using efficient high aspect ratio wings. We "simply" put six of them one after the other.

Of course this only makes sense if we separate them vertically, creating an "hexaplane" structure.
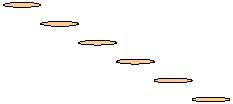
But... biplane, triplane and for sure hexaplane wing structures are complex and not optimal. So, we try to get the best of both systems. We'll use a plain surface for the most, inside part. And, separate little wings (winglets) for the outer parts.

This implies that those winglets each end separately, as in the six-plane structure. That way we have a straight rectangular wing for most of the surface yet with much less "red surface".

Stability 2
If you try out a glider with wide wings, it will probably succeed but you will notice a problem: the glider tends to turn itself to the right or to the left. Even if it stays flying on a straight path, its nose starts heading aside. It flies like a crab... Simple problem, simple solution: we add a vertical tail. But it's mandatory that you do not oversize its surface. A tiny surface, much like the horizontal tail, will do. A huge vertical surface would cause instabilities and you would get ugly flights. (The common solution to use a tail with more surface without creating instabilities is to reverse the tail: either place the vertical surface below the horizontal surface or use and inverted V tail (a /\ tail...).)

Oh, yeah, I forgot about the slight upward bend of the trailing edge. Now that we're using that tiny horizontal tail surface, it is most often no more needed...
There remains one big potential source of instability. If you launch this glider on a long flight, it may steadily tend to turn in a given direction and then the turn rate will augment towards a catastrophe (I rarely encounter that problem...) One common way to cope with this is to place the center of mass of the glider a little lower. That regulates the problem by the "pendulum effect".

Or you can use a positive dihedral (bend the wings slightly upward). Sometimes, the conceivers of an airplane have no other choice than to place the wings above the fuselage. A good example is the British "Harrier" VTOL fighter plane. But the strong pendulum effect is unwanted. In order to decrease it, the wings will have a negative dihedral...

Actually, the concept of stability can be perceived in a broader way. If you build a glider with a huge vertical tail (which should bring stability), a strong dihedral or the wings high above the center of gravity (which should bring stability), you probably will have the glider fly a "Dutch roll", that is oscillating in a corkscrew path. The Dutch roll... will be very stable. You do have stability... but not the kind of stability that is required for a standard airplane. (If you don't succeed in inducing the Dutch roll that way, try to put the center of gravity slightly backwards.)
Now your glider should have an efficient and stable flight. It should glide far, on a straight line, with no oscillations. In order to further better it, you can slightly streamline the wing airfoil profile, using some high grain sandpaper.

Angle of attack
One more sophisticated tuning is the AOA; the angle of attack of the wings. Try it out with the piece of cardboard that you hold in your hand and shear through the air. If you hold it parallel to the flow of air, there is no lift force. The more you pitch its leading edge upward, the higher the lift force. Till some high angle where the cardboard rather brakes than lift. The angle between the stream of air and the surface of the cardboard is the AOA.
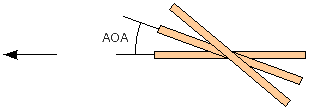
One obvious reason to tune the AOA is that this has a direct impact on the flight speed. If the AOA is low, the wings lift less, hence a higher speed is needed to get the appropriate lift force to counterbalance the weight of the glider. The self-regulation mechanism will (should) ensure that this speed is attained. On the opposite, a high angle will lead to a low speed of flight.
Some airplanes, like the flying flee, are driven (you don't pilot a flying flee, you drive it...) by changing the incidence of the main wing (the angle compared to the fuselage). The wing can rotate a few degrees around its main axis. The yoke that the pilot holds in his hands, is coupled to a system of levers that slightly rotates the wing. The flying flee has no horizontal tail surface...
Yet far out most airplanes are piloted using the horizontal tail. The angle and curvature of the tail surface changes according to the position the pilot gives to the yoke (and to the trim). This leads the airplane as a whole to pitch up or down, which changes the angle the wings travel through the air (the AOA). I was a little bit provocative on purpose, a while above, by telling that the horizontal tail had no purpose at all regarding the angle the glider travels through the air. Of course it has, in most cases. But never forget that the tail should always be little, in order not to supersede the self-regulation. (Airplanes do exist that have such a huge horizontal tail that actually they have two pairs of wings, but precise rules have to be followed to ensure stability.)
There is a second reason why you want to tune the AOA: there exist two optimal angles. The one that's optimal for you depends on what specific performance you want: that your glider flies the longest distance or that it stays the longest time in the air.
If you want your glider to fly far, then you need the highest aerodynamic yield. What you need is not the least wing drag... (You would get that by using an AOA of zero, hence no lift at all, hence only drag.) Rather, you need that the ratio between the wing lift and the wing drag be as high as possible. In other words: as much possible lift per unit drag. It seems that you get that by using an AOA of about 7°. I did not verify...
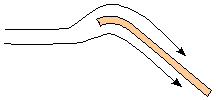
On the other hand, if you want the glider to stay the longest time in the air, then you need it to fly slow. Hence you need a strong lift from the wings, as long the drag is not too high. It seems that you get that by using an AOA of about 14°. I didn't verify either... But here we have a problem: a flat airfoil profile like we're using, will simply "stall" at an AOA of 14°. It is so that the air has to follow a strange path around the leading edge. Once this is exaggerated, due to the strong AOA, the air stream will detach from the wing and there will be no more proper lift.

One solution would be to bend the leading edge downward, to allow/force the air to follow the shape of the airfoil. Let's call it a beak. (That's what the slats on the wings of airliners are for, to allow a high AOA, in order to be able to take off and land at a lower speed.) Yet be careful: while such a beak can save the day at a strong AOA, it is useless and it causes drag at a low AOA. (That's why airliners retract the slats once in flight.)
If you seek performance, then you want the fuselage to travel through the air with the least drag. Hence parallel to the stream. So simply use the wing incidence that matches your needs, always make sure that the center of mass is at 1/4th chord and tune the horizontal tail (the elevator) to get the glider to travel at the wished angle through the air.
About the elevator... Don't make some errors. You want it to travel through the air without generating a high drag and without stalling. (That's why the tails of many airplanes have a delta shape; it's the shape that's the most tolerant to steep angles of attack.) You need an elevator that has enough surface to exert its desired control force while having only a few degrees of AOA. See for example the glider below. A beginner may claim that he managed to build a glider whose wings have a very steep AOA. And indeed the glider flies. But... it flies with the wings at a normal AOA and the rear tail bluntly braking. The fuselage and the nose are braking too, by the way. The incidence of the wings is 30°, as this is the manufactured angle between the fuselage and the wing plane, but the AOA in flight is just a few ° and the aerodynamic yield of the whole is bad.

Cambered airfoils
We only talked about flat airfoils.

Now about cambered airfoils.

One first advantage of cambered airfoils is that they lift more. Hence they allow to use wings with less surface, or reciprocally they allow to fly slower with a given wing surface. (FoilSim is a great Java applet developped by NASA: http://www.grc.nasa.gov/WWW/K-12/airplane/foil3.html )
(This property is used by ailerons and flaps. When the aileron is lowered at the end of a wing, this increases both the AOA and the camber of the wing, hence its lift force. This makes the airplane roll. The sideways movements of the yoke command the ailerons. The flaps, on the other hand, are deployed simultaneously on both sides of the wings. They strongly increase the curvature and allow to take off and land at a lower speed.)
The second advantage of the camber is that a slight camber allows for an even better aerodynamic yield. The lift to drag ratio is slightly better than that of a flat airfoil. (Yet a strong camber will brake a lot; it creates a lot of drag. This is not a problem when an airplane takes off with powerful engines and especially when it is landing. Flaps are often designed to increase the drag when they are fully deployed, to ensure a safe landing path. On most little airplanes, the flaps will not increase the wing surface, only its camber. On the B-52 bomber, the flaps cause no camber but they increase the surface of the wings. On modern airliners, the flaps both increase the curvature and the surface of the wings.)
So, if you want a glider designed for distance, you would use a slight camber, that yields the maximum efficiency. If you want a glider that stays in the air for a long while, you would use a stronger camber, that yields a lot of lift and allows to fly slower, hence stay longer in the air even if the increased drag decreases the distance.
But... are you sure that you need a camber? It can poison your glider... You can get the same lift with a flat profile, simply by using a wider chord. That compensates for the fact that the flat profile lifts less. And... there is an elephant of a good reason why you may want and benefit from a wider chord. Remember that when the chord is little and the flight speed is low, the air will no more follow the airfoil properly. By using a wider chord, you get a cleaner behavior at a given low speed. That's why butterflies have flat wings.
Reciprocally, at very high speeds, some camber will allow a shorter wing chord and this is much desirable because the problem with long chords and high speed is that strong and useless turbulence appear on the upside of the trailing part of the wing. You want less chord, in order to have less wing surface braked by turbulence.
One way to talk about it is that under a given chord x speed product you get no turbulence at all. That makes the air won't follow the wing profile. (Unless you artificially produce turbulence, say using turbulators, or widely flapping wings like little insects.) You need to be above a given chord x speed. But, when your chord x speed becomes very high, you get a lot of turbulence, useless to get a proper air path and that create a lot of drag.
Yet another advantage of flat profiles is that they have a neat behavior. Their stability is quite neutral and constant at any AOA. They simply lift proportionally to the AOA. Cambered airfoils tend to have a more constant lift, less dependent of the AOA. When using highly cambered airfoils, for example (don't), the AOA has few impact on the lift (but don't, the drag is tremendous). Common cambered airfoils lift even at a slightly negative AOA. (Consider that the AOA lifts and that the camber lifts, the lift force of the wing being the sum of the two.) But the real problem with cambered airfoils is that they are more unstable. Hence, either you must use a flying wing airfoil (with the end of the camber inverting to a short and slight upward camber) (exaggerated in the picture below) or you must use an appropriate horizontal tail. (That's why when a conventional airplane looses its tail, no recovery is possible and the airplane will tumble to the ground and crash.)

Thick airfoils
Whether they were flat, had a beak or were cambered, till now we talked only about thin profiles.
Why use a thick profile? The thicker an object, the more it brakes when passing through the air...
Early airplanes all had thin wings. This is desirable for very slow aircraft. The air won't move correctly around a thick profile, at very low airspeed. Yet the problem with thin profiles is the difficulty to get stiff wings. More exactly: stiff and lightweight. By using steel spars or plain wooden plates, the wings would be very stiff yet far too heavy. Instead, a huge structure was used made out of ropes and rods, to get something very lightweight and rigid. That was the biplane shape, like shown on these pictures: https://www.google.be/search?tbm=isch&q=early+biplane . But those ropes and rods cause drag. And two wings one above each other is not aerodynamically optimal.
By using a thick wing, you can put spars trough it, that have a strong diameter, hence that can be both stiff and reasonably lightweight. You still get a heavier wing, but you have no ropes and rods flapping in the airstream. The overall result is better. And... if the wing is not too thick, it won't drag much more than a thin wing in normal circumstances of flight, with a regular AOA.
(The WWII Spitfire fighter plane used quite thin wings anyway, in order to be able to fly at high speed at low altitude. In such circumstances, the wings were more a hinder than a necessary part of the airplane. Much littler wings would have allowed better performances. Yet the wings being quite flat, the impact of the problem was reduced because they would brake less when almost parallel to the airstream. (This caused yet another problem: the wings being less rigid, due to their flatness, at high speed they would twist when the pilot used the ailerons. That was vicious: say when the aileron went down, that would twist the wing to a lower AOA, hence the lift of the wing decreased instead of increasing and the plane rolled the other side.))
Thick wing... When something thick travels through the air, you must streamline it. The fuselage of an airliner would be a good illustration for this. It's a tube yet the fore part is rounded and the aft is a soft cone.

The more progressive the transitions between the shapes, the better the result.

For a wing profile, one tries to use an optimal aerodynamic shape, typically with the spar in the thickest part.

Most wings use such a shape. But... a toy glider is an extreme, as we already stated. Again, it's about turbulence. The fore part tends to avoid creating turbulence, while the aft part will eagerly trigger them. That's why the high-speed World War II P-51 Mustang fighter plane used an airfoil profile with a longer fore part and a shorter aft part; in order to minimise the part of the wing that creates the dreaded turbulences.

(Modern gliders have yet another way to shorten the aft part of the wing: the airfoil as a whole is kept short. Their wings have a short chord and that's one reason why they are so wide.)
On the other hand, a slow toy glider, that dearly needs some turbulence for the wings to wing, may benefit from the longest possible aft part.

But... thick airfoils are reportedly not good at very low speed. That would be because the leading edge of thin airfoils scrapes a little un-aerodynamically trough the air and creates turbulence. Those turbulence then ensure that the stream of air correctly follows the upper side of the airfoil. Some airfoil profiles exist that have a thin leading edge, then swell aerodynamically to contain a spar. The airfoil below would be a thin one, with both a curvature and a beak, and with a swell to contain a spar.

Airfoil Algebra
All the thick airfoil profiles drawn till now are flat. But of course they can have a camber and a beak. You "bend" the thick airfoil to match the desired camber. You "bend" its fore part to follow the desired beak curve.
Say you want to make a glider that must stay the longest possible time in the air. Low speed, high lift. Hence a long chord, a beak, some thickness in order to have lighter wings, a long aft part. You get this:
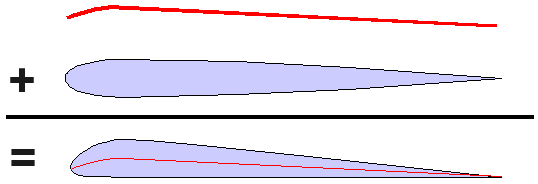
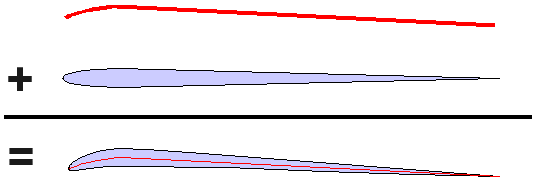
Now a common warning to beginners. Suppose you get excellent results with the composite airfoil depicted above (then tell me, I never tried it out). You love it. Your glider flies wonderfully. You get another kind of wood that's more rigid and you decide to make another wing, with a thinner airfoil, say two times thiner. But you want to keep the same aerodynamic quality! If you just take the above shape and you flatten it, halving every height, you're a beginner. Your glider will not have the same characteristics. Let's explain why. The flight characteristics are mostly imposed by the flat wing part, with the beak. The flesh you put around it is a minor detail. When you halved the airfoil, you changed the shape of the beak. Hence you changed the behavior of the wing. You must keep the same flat profile. But you are allowed to make the flesh around it thinner. So you get this:
This reasoning also yields that when you talk about wing incidence or angle of attack, the reference plane of the airfoil will be that of the virtual thin profile it contains. The picture below show the thick airfoil from above laying flat in the airstream:

But wait a minute. A rounded leading edge may be no good at very low speed. So let's use a sharp one:

Acknowledgments
I wish to thank:
The pioneers of flight, who made this dream reality and whose research is still ongoing.
My friend Jacques Donneux, for his thrive and dedication. He learned building gliders to many children.
My friends Didier Bizzarri and Yves-Dominique Franck, whose advice and data I have been thoroughly using.
The many experimenters and model glider builders that made data available on the Internet.
The NASA, for their excellent online documentation and tools.
My friend Frédéric Cloth, who hosts this page and many more.
Frank Armbruster for pointing out two misused technical terms.
https://blog.sciencenet.cn/blog-39356-1210289.html
上一篇:教授进中学之临汾一中行
下一篇:走近古印度飞行器维曼拿系列(九)--Sundara维曼拿飞行器探究(科普.原创)